Overview
Cleaning your GPU is a critical maintenance task that directly impacts performance, longevity, and system stability. Dust accumulation acts as an insulator, trapping heat and forcing your graphics card to throttle its clock speeds to prevent damage, leading to reduced frame rates, stuttering, and potential hardware failure. For NVIDIA, AMD, and Intel graphics cards alike, regular cleaning is non-negotiable for enthusiasts, gamers, and professionals who demand peak operation. This guide provides a comprehensive, step-by-step approach to safely disassemble, clean, and reassemble your GPU, ensuring optimal thermal management and avoiding common pitfalls that can cause irreversible damage.
Why Cleaning Your GPU Matters
Dust buildup silently throttles your gaming performance and risks hardware failure, making regular cleaning essential. Over time, dust clogs heatsink fins, coats fan blades, and insulates critical components like the GPU die and VRAM modules. This insulation reduces heat dissipation efficiency, causing temperatures to rise. Modern GPUs employ thermal throttling—automatically lowering clock speeds to cool down—which results in:
- Performance Drops: Noticeable decreases in FPS during intensive tasks like gaming or rendering.
- Increased Noise: Fans spin faster to compensate, generating more audible noise.
- Component Stress: Prolonged high temperatures can degrade solder joints, capacitors, and the GPU die itself, shortening lifespan.
Example: A GPU running at 85°C due to dust may throttle to 80% of its potential speed, cutting performance by 20% or more.
Regular cleaning, typically every 6-12 months depending on environment, restores thermal efficiency, maintains stable clock speeds, and prevents costly replacements. Ignoring this can lead to overheating shutdowns or permanent damage, especially in high-end models with dense heatsinks.
Essential Tools and Safety Precautions
Avoid costly mistakes by using the right tools and adhering to anti-static protocols. Incorrect tools can destroy delicate components, so preparation is key.
Safe Tools:
- Compressed Air: Use canned air or an air compressor (set to low PSI) to blow out dust. Hold fans stationary to prevent overspinning and bearing damage.
- Soft Brushes: Anti-static brushes or makeup brushes gently dislodge dust without scratching PCBs.
- Isopropyl Alcohol (90%+ purity): For cleaning thermal paste residue; higher purity evaporates quickly without residue.
- Lint-Free Cloths: Microfiber or coffee filters wipe away alcohol and debris.
- Thermal Paste: High-quality paste (e.g., Arctic MX-6, Noctua NT-H2) for reapplication.
- Screwdrivers: Precision Phillips and Torx bits to match your GPU's screws.
- Anti-Static Wrist Strap: Grounds you to prevent electrostatic discharge (ESD) that can fry circuits.
Deadly Tools to Avoid:
- Vacuum Cleaners: Generate static electricity that can instantly kill GPU components.
- Household Cleaners: Harsh chemicals can corrode metals or leave conductive residues.
- Abrasive Materials: Steel wool or rough cloths scratch surfaces and damage traces.
Safety Steps:
- Power Down: Shut off and unplug your PC, then press the power button to discharge residual electricity.
- Ground Yourself: Wear an anti-static wrist strap attached to a grounded metal part of the case.
- Work in a Clean Area: Use a non-static surface like a wooden table to prevent dust contamination.
Step 1: Removing the GPU from Your PC
Master the careful disconnection process to prevent damage to the PCIe slot and cables. Handling varies by card size and power connectors.
- Open the Case: Remove the side panel for access, laying the PC on its side if possible.
- Disconnect Power Cables: Unplug all PCIe power connectors (6-pin, 8-pin, or 12VHPWR for newer cards). Gently press the clip and pull straight out—avoid yanking.
- Release the PCIe Slot Latch: Locate the small latch at the end of the PCIe slot; press it down to unlock the GPU.
- Remove the GPU: Hold the card by its edges or bracket, gently rocking it side-to-side while pulling straight out. Support large, heavy cards with your other hand to avoid bending the slot.
Tip: For tight spaces, temporarily remove adjacent components or use a magnetic tray to keep screws organized.
Once removed, place the GPU on an anti-static mat or its original packaging. Avoid touching gold contacts or circuit boards directly.
Step 2: Disassembling the GPU Cooler
Dive into precise steps to safely separate the heatsink from the PCB, revealing hidden dust traps and old thermal paste. This process exposes the GPU die, VRAM, and VRMs for thorough cleaning.
- Document Screw Locations: Take photos or notes of screw positions, as they may vary in length and type. Misplacement can damage the PCB.
- Remove Backplate Screws (if present): Unscrew any backplate fasteners to access the main heatsink screws.
- Unscrew Heatsink Mounting Screws: Carefully remove all screws securing the heatsink to the PCB. Use organized containers to separate screws by type.
- Detach the Heatsink: Gently lift the heatsink straight up. If resistance occurs, gently twist or use a plastic spudger to pry—never force it, as thermal paste can act as an adhesive.
- Disconnect Fan Cables: Unplug any fan or RGB cables from the PCB by pulling the connector, not the wires.
You'll now see the GPU die covered in dried thermal paste and dust-packed heatsink fins. This disassembly allows access to areas where dust accumulates unseen, such as between fin stacks and around heat pipes.
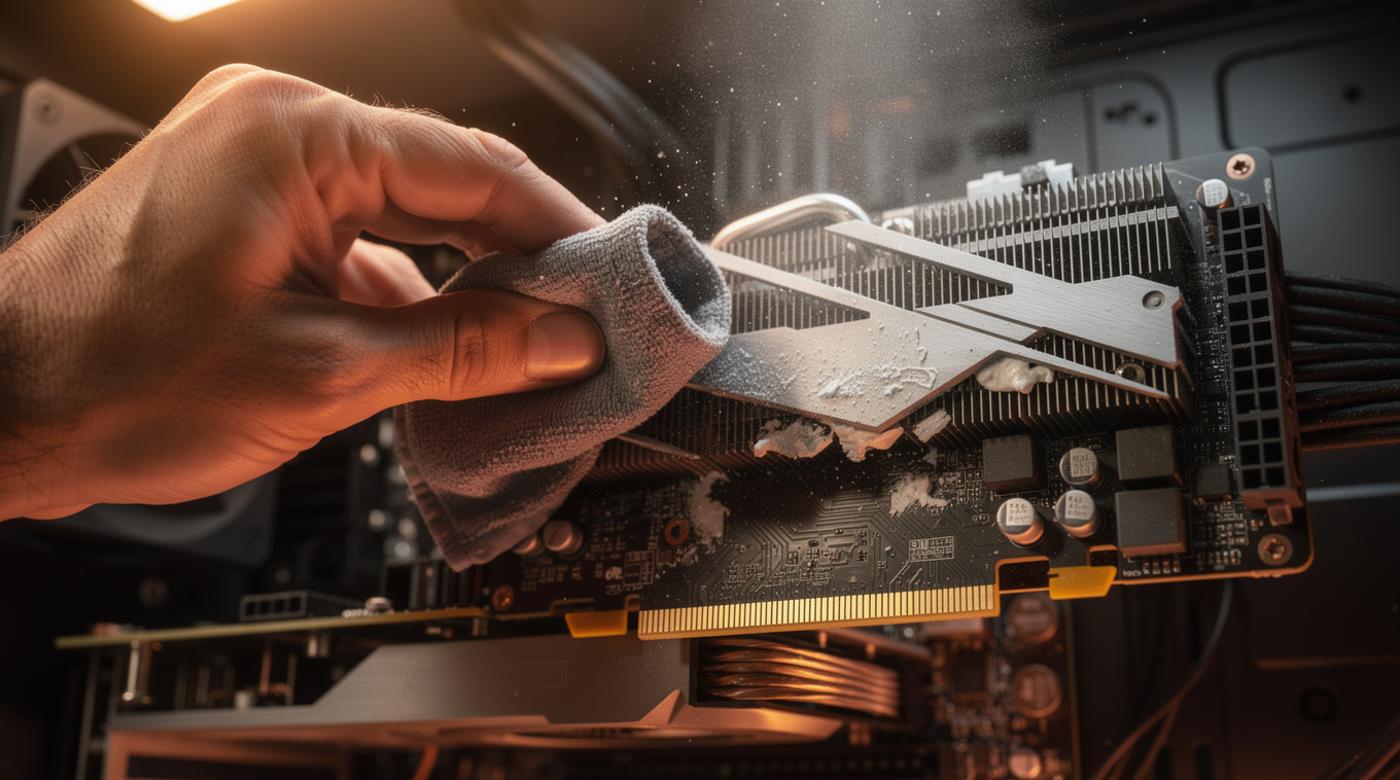
Step 3: Cleaning the Heatsink and Fans
Explore effective techniques using compressed air and brushes to remove stubborn dust without bending fins or stressing fan bearings. This step restores airflow and cooling efficiency.
Cleaning the Heatsink:
- Blow Out Dust: Use compressed air to blast dust from heatsink fins, directing airflow from the inside out to push debris away. Hold the heatsink over a trash can to contain mess.
- Brush Residual Dust: For caked-on dust, gently use a soft brush to loosen particles, then blow them out. Avoid bending aluminum or copper fins.
- Clean Heat Pipes: Wipe heat pipes with a lint-free cloth dampened with isopropyl alcohol to remove grime.
Cleaning the Fans:
- Hold Fans Still: While blowing compressed air, use a finger or tool to prevent fan blades from spinning, which can generate current and damage bearings.
- Wipe Blades: Use a cloth with alcohol to clean fan blades and housings, removing oily dust that impedes rotation.
Cleaning the PCB:
- Remove Dust: Use compressed air and a brush to clear dust from the PCB, focusing on VRM areas and capacitors.
- Clean Thermal Paste Residue: Apply isopropyl alcohol to a lint-free cloth and gently wipe the GPU die and surrounding components until all old paste is removed. For stubborn residue, use a plastic scraper carefully.
Allow all parts to air-dry completely before reassembly to prevent short circuits.
Step 4: Reapplying Thermal Paste
Learn why fresh thermal paste is crucial for heat transfer and how to apply it perfectly to avoid air bubbles and overheating. Old paste dries out and cracks, reducing thermal conductivity by up to 30%.
- Choose Quality Paste: Use a non-conductive, high-performance paste. Conductive pastes risk shorting if spilled.
- Apply the Right Amount: For GPU dies, a pea-sized dot (about 3-5mm diameter) in the center is ideal. Avoid spreading manually, as pressure from the heatsink will distribute it evenly.
- Avoid Common Errors:
- Too Much Paste: Excess can spill onto components, causing insulation or shorts.
- Too Little Paste: Inadequate coverage creates hot spots.
- Air Pockets: Ensure a smooth, bubble-free application by not over-manipulating.
Note: Some GPUs have multiple chips (e.g., GPU die and VRAM). Check if your model requires paste on all; for VRAM, use thermal pads instead of paste.
Once applied, proceed immediately to reassembly to prevent dust settling on the paste.
Step 5: Reassembling and Testing
Ensure your GPU runs cooler and quieter by following reassembly best practices and running stress tests to verify stability. Proper reassembly is critical to avoid loose connections or uneven mounting pressure.
- Reconnect Fan Cables: Plug fan and RGB cables back into the PCB, ensuring secure connections.
- Align and Mount Heatsink: Carefully lower the heatsink onto the PCB, aligning screw holes. Avoid shifting to prevent paste smearing.
- Tighten Screws Gradually: Use a crisscross pattern (like tightening a car tire) to screw in heatsink mounts evenly. Stop when snug—over-tightening can crack the die or strip threads.
- Reattach Backplate: If removed, screw the backplate back on.
- Reinstall in PC: Insert the GPU into the PCIe slot until it clicks, reconnect power cables, and secure any brackets.
Testing:
- Boot Up: Power on the PC and check for fan spin and display output.
- Monitor Temperatures: Use software like HWMonitor or GPU-Z to check idle temps (should be 30-40°C for air-cooled cards).
- Stress Test: Run benchmarks (e.g., FurMark, 3DMark) for 15-30 minutes to ensure stability under load. Temperatures should stay within manufacturer specs (typically 70-85°C for most cards).
- Listen for Noise: Fans should run smoothly without grinding or rattling.
If temperatures are high or unstable, disassemble to check paste application or for missed dust.
Common Mistakes to Avoid
Identify pitfalls like using vacuum cleaners or harsh chemicals that can destroy your GPU, and how to steer clear of them. Awareness prevents irreversible damage.
- Using a Vacuum Cleaner: Generates static discharge that can fry sensitive electronics. Always use compressed air instead.
- Skipping Anti-Static Measures: ESD can occur without visible signs, damaging components. Always ground yourself.
- Applying Too Much Thermal Paste: Excess paste can seep onto circuits, causing shorts or insulation. Stick to a pea-sized amount.
- Forcing Components During Disassembly: If a heatsink won't budge, gently twist or apply isopropyl alcohol to loosen paste—never pry hard.
- Cleaning with Harsh Chemicals: Avoid window cleaners or solvents; they can leave residues or corrode metals. Use only isopropyl alcohol.
- Neglecting Fan Bearings: Letting fans spin freely during cleaning can generate current and wear out bearings. Always hold them stationary.
- Misplacing Screws: Mixing up screw lengths can lead to improper mounting or PCB damage. Document and organize meticulously.
By avoiding these errors, you protect your investment and ensure a successful cleaning process.
Conclusion
Implement a simple maintenance schedule to keep your graphics card performing at its peak for years, saving money on replacements. Regular cleaning every 6-12 months, depending on dust levels in your environment, is a proactive measure that enhances performance, reduces noise, and extends hardware life. Follow this guide's steps—using safe tools, adhering to anti-static precautions, and avoiding common mistakes—to maintain optimal thermal management. A clean GPU not only delivers smoother gaming and rendering but also prevents overheating-related failures, ensuring reliability for demanding tasks. Start today by inspecting your system and planning your first cleaning session; your GPU will thank you with cooler temps and sustained high performance.